Jekyll is a Ruby-based engine which helps you to create static websites and blogs. It’s one of the most popular systems out there which comes with tons of plugins and examples. One of the advantages is that it is supported out-of-the-box by Github Pages where you get the hosting for static websites for free, including the possibility to have a custom domain. In this post, I will show you an easy way to add a comments widget to your static website based on Jekyll using Just Comments. By default Jekyll recommends to use Disqus but, in my opinion, Just Comments is much a better option because its client-side bundle is less bulky and it does not focus on monetizing via ads.
Creating a new blog with Jekyll
Skip this section if you already have a blog with Jekyll. Though, creating a new blog is easy:
jekyll new my-awesome-site
Change the directory to my-awesome-site and run the following command which starts a local server with the generated website at http://localhost:4000
bundle exec jekyll serve
Adding comments to Jekyll blog
Now when we have at least a basic blog, we can add comments so that your visitors can comment on your content.
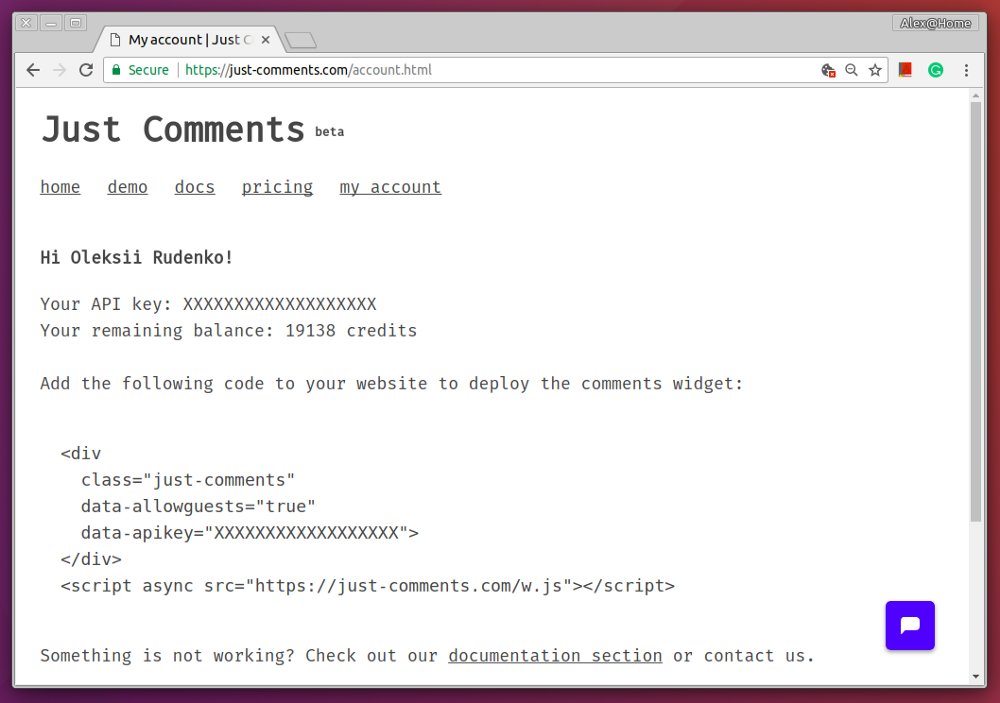
First, create an account at Just Comments by logging in via Github or Facebook. You will see your API key that the system has automatically generated.
Now we need to modify the blog template and integrate the widget into our blog. You do this by customizing the existing theme of your blog. For example, to customize the default theme called minima, create the file _includes/head.html in your favorite editor. Place the following content in the file:
<head>
  <meta charset="utf-8">
  <meta http-equiv="X-UA-Compatible" content="IE=edge">
  <meta name="viewport" content="width=device-width, initial-scale=1">
  {% seo %}
  <link rel="stylesheet" href="{{ "/assets/main.css" | relative_url }}">
  <link rel="alternate" type="application/rss+xml"
    title="{{ site.title | escape }}" href="{{ "/feed.xml" | relative_url }}">
  {% if jekyll.environment == 'production' and site.google_analytics %}
    {% include google-analytics.html %}
  {% endif %}
  <!-- START OF RELEVANT PART -->
  <script async src="https://just-comments.com/w2.js"></script>
  <!-- END OF RELEVANT PART -->
</head>
By adding the script tag, we embed the widget provided by Just Comments which will power our comments.
Second, place the container element for the comments where you want it to be. For this, we need to customize the post template by creating the file ./_layouts/post.html with the following content Replace YOUR_API_KEY with the actual API key for your Just Comments account.
---
layout: default
---
<article class="post h-entry" itemscope itemtype="http://schema.org/BlogPosting">

  <header class="post-header">
    <h1 class="post-title p-name" itemprop="name headline">{{ page.title | escape }}</h1>
    <p class="post-meta">
      <time class="dt-published" datetime="{{ page.date | date_to_xmlschema }}" itemprop="datePublished">
        {% assign date_format = site.minima.date_format | default: "%b %-d, %Y" %}
        {{ page.date | date: date_format }}
      </time>
      {% if page.author %}
        • <span itemprop="author" itemscope itemtype="http://schema.org/Person">
        <span class="p-author h-card" itemprop="name">{{ page.author }}</span>
        </span>
      {% endif %}</p>
  </header>

  <div class="post-content e-content" itemprop="articleBody">
    {{ content }}
  </div>

  <!-- START OF RELEVANT PART -->
  <div
    class="just-comments"
    data-allowguests="true"
    data-apikey="YOUR_API_KEY">
  </div>
  <!-- END OF RELEVANT PART -->

  <a class="u-url" href="{{ page.url | relative_url }}" hidden></a>
</article>
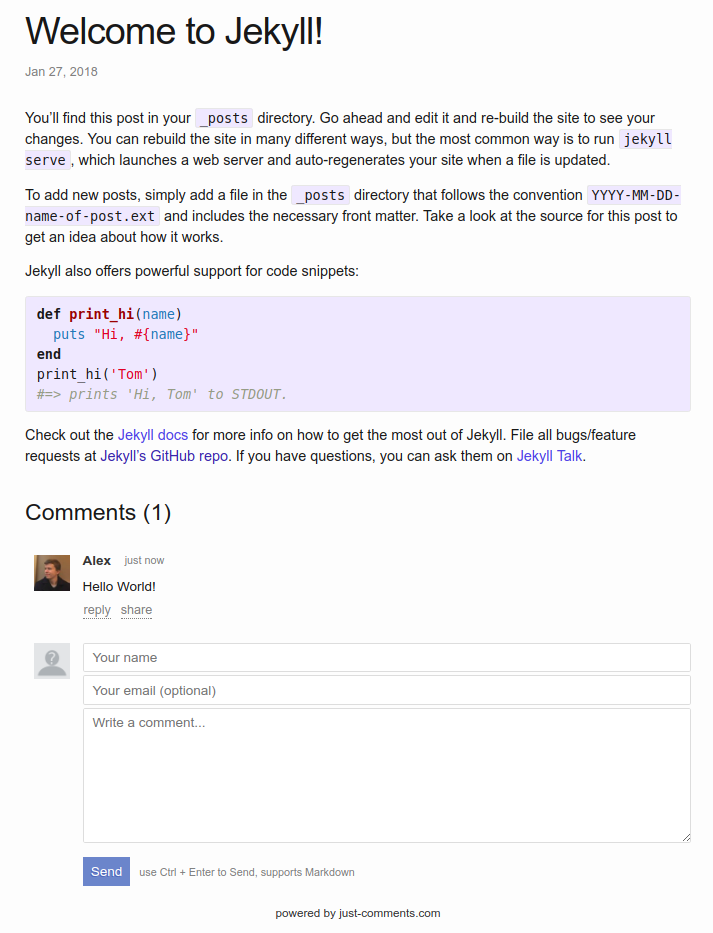
The result looks something like this:
About Just Comments
Just Comments is a service offering a comment system. It’s not entirely free, but it’s almost free for small websites which don’t get millions of visitors. Just Comments charges you for a so-called comment pageview, and one comment pageview costs as little as $0.00001, or $10 for 1,000,000 pageviews. Read more about Just Comments’ pricing and possible integrations at https://just-comments.com/